Log Cabin Quilt Tutorial⁚ A Comprehensive Guide
Embark on a quilting journey with this comprehensive guide. Learn to craft classic and modern log cabin quilts, mastering block variations, from traditional to contemporary designs. Explore diverse layouts, accurate seam techniques, and finishing touches for a professional look. Discover the rich history and endless possibilities of this timeless pattern.
Choosing Your Fabric⁚ Color Palettes and Quantity
Fabric selection is paramount for a stunning log cabin quilt. Consider your desired aesthetic – a traditional look might utilize contrasting light and dark fabrics, perhaps in a classic red, white, and blue palette. Modern interpretations could embrace vibrant colors, ombre effects, or a scrappy, eclectic mix of prints. For a 50×60″ throw, three yards of fabric for the quilt top is a good starting point, but this can vary depending on block size and design complexity. Remember to account for additional fabric for the backing and binding, allowing for generous seam allowances and potential mistakes. Pre-cut fabrics like jelly rolls and charm packs offer convenience and coordinated color schemes, simplifying the selection process. Experiment with different fabric types; cotton is popular for its ease of use and versatility, but linen or other blends can add texture and visual interest. Planning your color palette and calculating the required yardage beforehand ensures a smooth and enjoyable quilting experience.
Understanding Log Cabin Block Variations⁚ Traditional vs. Modern
The log cabin block’s enduring appeal lies in its adaptability. Traditional log cabin blocks typically feature alternating light and dark fabric strips arranged around a central square, creating a visually striking, symmetrical pattern. This classic design often evokes a sense of rustic charm and historical significance. Modern interpretations, however, offer a vast array of creative possibilities. These variations might incorporate unconventional color palettes, irregular strip widths for a “wonky” effect, or incorporate additional design elements within the block itself, such as stars or other motifs replacing the simple central square. Some modern designs might even feature curved or irregular shapes, moving away from the strictly geometric nature of the traditional block. The “quarter log cabin” variation, for instance, offsets the central square, creating an asymmetrical aesthetic. The choice between traditional and modern approaches depends entirely on your personal style and the overall vision for your quilt. Both approaches offer unique visual impact and allow for a personalized creative expression.

Essential Supplies and Tools⁚ Fabrics, Cutting Mat, Rotary Cutter
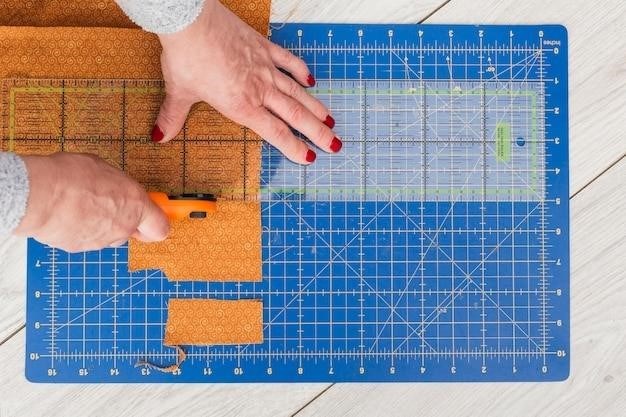
Before embarking on your log cabin quilt adventure, gather the necessary supplies. First and foremost is fabric—consider your desired color scheme and the overall aesthetic you wish to achieve. A variety of fabrics can be used, from scraps to pre-cut jelly rolls or charm packs, offering convenience and efficient use of materials. The amount of fabric needed will vary depending on the size and complexity of your quilt design. Accurate cutting is crucial for neat seams, so a self-healing cutting mat is essential. This provides a protective surface to prevent damage to your work surface and ensures precise cuts. A rotary cutter complements the cutting mat, enabling swift and clean cuts of fabric strips, ensuring consistency in your log cabin blocks. These tools, combined with basic sewing supplies such as thread, pins, and scissors, form the foundation for a successful log cabin quilt project. Remember to choose high-quality tools for a more enjoyable and efficient quilting experience. Investing in durable, reliable tools will pay off in the long run.
Constructing the Basic Log Cabin Block⁚ Step-by-Step Instructions
Begin by selecting a center square for your log cabin block. This square will determine the overall size of your block; common sizes include 2.5-inch or 4-inch squares. Next, choose fabric strips of varying widths, traditionally alternating light and dark colors. The width of these strips dictates the size and look of the final block. Begin by sewing a fabric strip to one side of the center square, using a consistent ¼-inch seam allowance for precision. Press the seam open to ensure a flat, clean finish. Continue adding strips, one at a time, to the sides of the growing block, alternating light and dark fabrics and always pressing seams open. Each strip should be sewn to the previous strip, creating a square-within-a-square effect. This process of adding strips and pressing seams open continues until the block reaches your desired size. Remember to maintain accuracy in seam allowance throughout; this is critical for creating neat and well-proportioned blocks. Once the block reaches the target size, you have successfully constructed a basic log cabin block, ready to be incorporated into your larger quilt design.
Working with Pre-Cut Fabrics⁚ Jelly Rolls and Charm Packs
Pre-cut fabrics offer a convenient and efficient approach to log cabin quilt construction. Jelly rolls, comprised of 2;5-inch wide strips, are ideally suited for creating the “logs” of your blocks. Their consistent width simplifies the piecing process, minimizing the need for individual strip cutting. To use a jelly roll, select coordinating colorways that align with your desired aesthetic. Begin by laying out your strips to plan your block designs before sewing. Remember that a planned layout helps avoid fabric waste and ensures your color scheme looks exactly as you envisioned. Charm packs, featuring 5-inch squares, provide a different approach. While not directly used as strips, charm packs can be efficiently cut into strips to create your log cabin blocks. Cutting the squares into strips allows for a wider array of color possibilities within each block. Both jelly rolls and charm packs significantly reduce preparation time, making this method perfect for quilters who prefer a streamlined approach to fabric selection and cutting; Embrace the convenience and speed that pre-cuts offer while still maintaining the charm and character of a handcrafted quilt.
Creating Different Block Sizes⁚ Adjusting Strip Widths
The beauty of log cabin blocks lies in their adaptability. By simply adjusting the width of your fabric strips, you can effortlessly create blocks of varying sizes. For instance, using 1.5-inch strips will yield smaller, more intricate blocks, perfect for detailed designs or quilts requiring a high number of blocks. These smaller blocks allow for more complex patterns and color variations within a smaller space. Conversely, employing wider strips, such as 3-inch or even 4-inch widths, results in larger, bolder blocks that can significantly reduce the overall piecing time. This makes them an excellent choice for larger quilts or those needing a quicker construction process. Remember to maintain consistent strip widths within each individual block to ensure a neat and balanced appearance. Experiment with different strip widths to achieve your desired block dimensions and overall quilt scale. Consider the final size of your quilt when selecting strip widths; narrower strips will naturally require more piecing for the same overall quilt dimensions. This creative control over block size allows for boundless design possibilities, whether you prefer a delicate miniature or a grand, statement piece.
Arranging Your Blocks⁚ Layout Options and Design Considerations
Once your log cabin blocks are complete, the arrangement significantly impacts the quilt’s final aesthetic. Traditional layouts involve a straightforward grid pattern, offering a classic and balanced look. However, numerous alternative arrangements exist to enhance creativity. Consider a diagonal setting, creating a dynamic visual flow. This option showcases the blocks’ individual designs effectively. Alternatively, a curved or meandering layout can add a whimsical touch, perfect for a more playful quilt. For a modern feel, experiment with asymmetrical arrangements, breaking the expected symmetry and adding visual interest. Before committing to a specific arrangement, create a mock layout using your completed blocks or paper templates. This allows you to visualize the overall design and make adjustments as needed. Think about the color distribution; a balanced layout ensures even color distribution, while intentional asymmetry can create focal points. The size and shape of your blocks also play a role; larger blocks lend themselves to simpler layouts, whereas smaller blocks accommodate more complex arrangements. Remember to account for borders when planning your layout, ensuring they complement the overall design and enhance the quilt’s visual appeal.
Joining Log Cabin Blocks⁚ Accurate Seam Allowance and Techniques
Precise seam allowance is crucial for creating a well-aligned and professional-looking log cabin quilt. Maintaining a consistent 1/4-inch seam allowance throughout the process ensures that your blocks fit together seamlessly. Using a rotary cutter and a self-healing cutting mat enhances accuracy, especially when working with numerous blocks. Before joining, carefully press each block, ensuring all seams are flat and open. This prevents bulk and creates a smoother surface for joining. Accurate placement is paramount; consider using pins or clips to hold the blocks together before stitching to prevent shifting during sewing. When stitching, use a consistent speed and even pressure to maintain uniform seam allowances; A walking foot on your sewing machine can be beneficial, preventing fabric layers from shifting and ensuring even feeding. For hand-quilting enthusiasts, precise stitching is equally vital. Accurate seam allowance, along with consistent tension, contribute to a well-finished quilt. After joining, press the seams once again. Pressing open seams creates a flatter quilt top, which is essential for achieving a professional finish. Consider using a seam roller to further flatten seams and ensure a smooth surface, ready for the quilting process. Remember, precision during this phase significantly impacts the quilt’s final appearance and quality.
Adding Borders⁚ Enhancing the Quilt’s Overall Aesthetic
Borders offer a fantastic opportunity to enhance your log cabin quilt’s aesthetic appeal and overall design. They frame the quilt top, creating a polished and finished look. The width of the border(s) is a design choice; wider borders provide a more substantial frame, while narrower ones offer a subtler accent. Consider using a contrasting fabric to create a bold visual impact or a coordinating fabric for a more subtle effect. A single border is a classic choice, providing a simple yet elegant finish. Multiple borders, perhaps with varying widths and fabrics, can add complexity and visual interest. For example, a narrow inner border and a wider outer border can create a layered effect. When adding borders, ensure that the fabric is cut to the precise dimensions needed to achieve a neat and even border. Accurate measuring and cutting are essential for a professional finish. Pay close attention to aligning the border pieces with the quilt top’s edges and corners. Using pins or clips to secure the fabric before stitching will prevent shifting. Choose a stitch length that is appropriate for the fabric and the sewing machine. A consistent stitch length contributes to a professional finish. After sewing on the borders, press them carefully to create sharp creases and a clean look. Pressing the seams open is recommended to maintain flatness. The addition of borders transforms your quilt from a collection of blocks into a cohesive and beautifully framed piece of textile art.
Quilting Your Top⁚ Hand Quilting vs. Machine Quilting
The quilting stage unites the quilt top, batting, and backing, creating a three-layered, cozy textile. Two primary methods exist⁚ hand quilting and machine quilting. Hand quilting, a time-honored technique, involves stitching through all three layers using a needle and thread. It’s a slower process, allowing for intricate designs and personalized touches. The result is often a textured, heirloom-quality quilt. Beginners might opt for simple running stitches or straight lines, while more experienced quilters can incorporate elaborate patterns. Machine quilting offers speed and efficiency, ideal for larger quilts or those with tighter deadlines. Various machine quilting techniques exist, from straight-line stitching to free-motion designs. A walking foot is useful for consistent feeding of multiple layers, ensuring even stitch distribution. For intricate patterns, templates or stencils can be used to guide the stitching process. Regardless of the chosen method, proper basting is crucial. Basting securely joins the layers, preventing shifting during quilting. Options include safety pins, basting spray, or hand basting. The choice depends on personal preference and quilt size. Consistent tension in both hand and machine quilting prevents puckering and ensures a smooth, even finish. After quilting, carefully trim away excess batting and backing, leaving a neat edge. Both hand and machine quilting offer unique benefits and contribute to the quilt’s overall aesthetic and durability. The best approach depends on your skill level, time constraints, and desired result.
Backing and Binding⁚ Finishing Touches for a Professional Look
With the quilting complete, the next step is preparing the backing fabric. Select a fabric that complements the quilt top, considering both color and texture; Ensure the backing is adequately sized, adding extra inches beyond the quilt top dimensions to account for seam allowances and binding. Accurately square up the backing fabric, ensuring all four sides are perfectly straight and at 90-degree angles. This precise cutting is crucial for a professional finish. Lay the backing fabric face down, and place the quilted top on top, right side up. Carefully center the quilt top on the backing. Baste the layers together, using either safety pins, basting spray, or hand basting, to prevent shifting during the binding process. Binding provides a neat, finished edge to the quilt and protects the raw edges from fraying. Cut bias strips of fabric, typically 2 1/2 to 2 3/4 inches wide, for the binding. The bias cut allows for a flexible binding that conforms smoothly to the quilt’s edges. Join the binding strips end to end, creating a continuous length. Attach the binding to the quilt’s outer edge, using either a machine or hand-sewing method. A mitered corner technique adds a polished look to the corners. After attaching the binding to the front, carefully fold it over to the back and stitch it down, either by hand or machine. Trim away any excess fabric. Ensure the binding is neatly stitched and evenly spaced around the quilt’s perimeter. The final step is to admire your beautifully finished log cabin quilt, a testament to your skill and dedication.
Adding a Hanging Sleeve or Label⁚ Personalizing Your Quilt
To enhance your log cabin quilt and add a personal touch, consider incorporating a hanging sleeve or a label. A hanging sleeve allows for easy display of your quilt. Cut a strip of fabric approximately 4-6 inches wide and the length of the desired sleeve. Fold the strip in half lengthwise, with right sides facing, and stitch along the long edge. Turn the sleeve right side out, creating a tube. Position the sleeve along the top edge of your quilt’s backing, centering it evenly. Stitch the sleeve securely to the backing, ensuring it’s firmly attached. This creates a channel through which you can insert a rod or dowel for hanging. Alternatively, a personalized label adds a unique touch. Design your label using fabric, felt, or even a printed fabric tag. Include your name, the date of completion, or a special message. You might include details about the quilt’s pattern or inspiration. Carefully stitch the label to the quilt’s back, using a decorative stitch for an added element of artistry. A label serves as a permanent reminder of the time and effort invested in creating the quilt, and provides valuable information about its origins. Choose a placement that is visually appealing and easily accessible, such as a corner or the lower edge. Remember, these personal touches add a unique identity to your quilt, transforming it from a beautiful creation into a cherished heirloom. These simple additions significantly elevate the quilt’s overall aesthetic and sentimental value.
Resources and Further Learning⁚ Online Tutorials and Patterns
The world of quilting offers a wealth of resources for expanding your log cabin expertise. Numerous online platforms provide detailed tutorials, patterns, and inspiration. Websites like FreeQuilt.com offer free log cabin quilt patterns, complete with materials lists and step-by-step guides. These resources cater to all skill levels, from beginners seeking their first log cabin project to experienced quilters looking for innovative variations. You’ll find patterns for traditional blocks, modern interpretations, and variations such as Courthouse Steps. YouTube channels dedicated to quilting showcase video tutorials that visually demonstrate each step of the process, offering a dynamic learning experience. Many tutorials focus on specific techniques, such as joining blocks accurately or adding borders effectively. Blogs and online quilting communities offer a platform to connect with fellow enthusiasts, share tips, and seek advice. These communities are invaluable resources for troubleshooting problems, discovering new techniques, and gaining inspiration from other quilters’ projects. By exploring these online resources, you can continuously refine your log cabin skills, discover new design possibilities, and stay updated on the latest trends in quilt making. Remember to explore various pattern sources to find a style that matches your personal preference and skill level. The online quilting world is a vast and supportive community, always ready to help you in your creative journey.