Selecting and Preparing for Vertical Metal Siding Installation
Choosing the right metal siding involves considering durability, aesthetics, and cost. Assess your existing wall for damage, ensuring it’s clean and even for optimal installation. Gather necessary tools like measuring tapes, levels, shears, and fasteners, along with the chosen siding, J-channel, and corner trim.
Choosing the Right Metal Siding
Selecting the appropriate metal siding is crucial for a successful installation and long-lasting result. Consider factors such as material type (steel, aluminum, zinc); gauge (thickness, impacting durability); and finish (color, texture, and protective coatings). Steel offers superior strength and longevity, while aluminum provides lighter weight and corrosion resistance. Zinc offers a unique aesthetic and natural weathering patina. The gauge influences both cost and resilience against impacts and strong winds. The finish protects against rust and fading, contributing to the siding’s overall lifespan and visual appeal. Consider the building’s style, climate, and budget when making your selection. Research manufacturers’ warranties and compare product specifications to ensure your choice aligns with your needs and expectations for appearance and longevity.
Assessing the Existing Wall Surface
Before initiating the vertical metal siding installation, a thorough assessment of the existing wall surface is paramount. This crucial step ensures a smooth and successful installation process, preventing future problems. Begin by inspecting the wall for any damage, such as cracks, holes, or loose sections. Address any significant damage through necessary repairs, ensuring a solid and even foundation for the new siding. Check for unevenness or significant protrusions that could interfere with the siding’s installation. Consider using furring strips to create a level surface if irregularities exist. Clean the wall thoroughly to remove dirt, debris, loose paint, or other contaminants that could compromise the bond between the siding and the wall. A clean, dry surface is essential for optimal adhesion and prevents moisture buildup, which can lead to corrosion or damage over time. Proper preparation at this stage significantly contributes to the longevity and aesthetic appeal of the finished project.
Gathering Necessary Tools and Materials
To ensure a smooth and efficient vertical metal siding installation, gathering the necessary tools and materials beforehand is crucial. This preparation minimizes interruptions and delays during the project. Essential tools include a measuring tape for accurate measurements, a level to ensure straight lines and plumb installations, and metal shears or a cutting tool specifically designed for metal siding for precise cuts. An electric or pneumatic nailer or screw gun will significantly speed up the fastening process, while a safety harness and fall protection equipment are essential for working at heights. In terms of materials, you’ll need the vertical metal siding panels themselves, choosing a style and color that complements your home’s design. J-channel trim is necessary for finishing edges and corners, providing a neat and watertight seal. Corner trim pieces will ensure a professional finish at exterior corners. Don’t forget appropriate fasteners like screws or nails, designed for metal siding, and construction adhesive for added security. Finally, caulk can be used to seal any gaps or joints for weatherproofing.
Installing the Vertical Metal Siding
This section details the core process⁚ installing furring strips for wall preparation (if needed), fitting J-channel and corner trim for a secure and aesthetically pleasing base, and finally, attaching the vertical siding panels themselves, ensuring proper overlap and alignment.
Installing Furring Strips (if needed)
Furring strips provide a crucial foundation for uneven walls, ensuring a smooth surface for the siding and preventing irregularities from showing through. Before starting, carefully inspect the existing wall for any significant damage or unevenness. Repair any issues, such as cracks or holes, and ensure the wall surface is clean and dry. This step is essential for a professional-looking and durable final result. If the wall is already perfectly flat and plumb, this step can be skipped. However, if the wall is uneven, furring strips are essential for creating a level surface for the siding. They act as a support structure, compensating for any imperfections in the underlying wall.
For installation, measure and cut the furring strips to the appropriate lengths. Space them evenly, typically 16 inches apart, using a level to maintain consistent horizontal alignment. Securely fasten the strips to the wall using appropriate fasteners, ensuring they are firmly attached and level. Pay close attention to alignment, as any misalignment in this stage will be reflected in the final siding installation. Once the furring strips are in place, double-check for levelness and stability before proceeding to the next stage.
Remember to use appropriate fasteners for your wall material. For example, use galvanized screws for wood or masonry nails for concrete. Always follow manufacturer’s instructions for your specific siding and furring strips. This ensures a secure and long-lasting installation. A properly installed furring strip system creates a consistent and even surface, making the subsequent installation of the metal siding much easier and more effective. This will ultimately lead to a superior final product and a more professional finish.
Installing J-Channel and Corner Trim
J-channel and corner trim are essential for creating a neat, professional finish and protecting the edges of your vertical metal siding. Begin by installing the J-channel along the bottom edge of the wall, ensuring it’s perfectly level and aligned. This provides a starting point for the siding panels and prevents water from seeping underneath. Use appropriate fasteners, spacing them evenly to ensure a secure attachment. For corners, measure and cut the corner trim to the required length, ensuring a snug fit. Overlap the pieces by at least four inches for added strength and water resistance.
Around windows and doors, install the J-channel to create a clean transition between the siding and the openings. This protects the edges of the openings from moisture and prevents damage. Accurate measurements are critical here to ensure a proper fit. Carefully measure and cut the J-channel to precisely fit around each window and door, allowing for proper overlap and a smooth transition. Secure it in place with the appropriate fasteners, ensuring it’s firmly attached and aligned.
Use silicone caulk to seal any seams or gaps in the J-channel and corner trim to further enhance water resistance. This creates a weathertight seal, preventing water penetration and protecting your building. Remember to choose trim that complements the style and color of your siding. Carefully consider the overall design aesthetic and select trims that enhance the building’s appearance. Properly installed J-channel and corner trim not only improve the look of your siding but also add to its longevity and protection against the elements. A well-executed trim installation is a hallmark of professional-quality work.
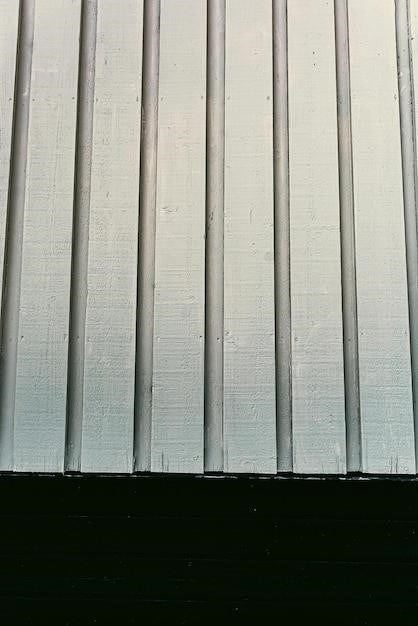
Installing the Siding Panels
Starting at the bottom, align the first panel with the installed J-channel, ensuring it’s plumb and level. Secure it to the wall using galvanized fasteners, following the manufacturer’s recommended spacing. Overlapping panels is crucial for water resistance; each subsequent panel should overlap the previous one by the specified amount (typically 2-6 inches). Maintain consistent panel alignment throughout the installation process, checking for plumbness and levelness frequently using a level and a plumb bob. This ensures a uniform and aesthetically pleasing finish.
When working around corners, carefully measure and cut the panels to fit. Use appropriate tools, such as metal shears, for clean, precise cuts. Seamless integration into corner trim is key to maintain a watertight seal and a pleasing appearance. For obstructions like windows and doors, trim panels to fit snugly within the J-channel, ensuring a clean and professional appearance. Remember to use appropriate fasteners suitable for the type of siding and wall material.
Work from bottom to top, maintaining consistent overlap. A helper can significantly improve efficiency and accuracy by holding panels in place while you secure them. Always use the recommended fasteners, ensuring they are properly installed to avoid damage to the siding and to maintain structural integrity. Regularly check panel alignment to prevent misalignment and ensure a clean, professional finish. Proper installation of the siding panels is essential for both the aesthetic appeal and the long-term durability of your vertical metal siding.

Finishing and Maintaining the Installation
Complete the installation by adding base trim and any necessary final trims, ensuring a clean, finished look. Regularly inspect for loose fasteners or damage, and pressure wash annually for optimal maintenance. Address any issues promptly to prevent further problems.
Installing Base Trim and Final Trims
Once the main siding panels are installed and secured, the final step involves installing the base trim and any other necessary trims to complete the project. The base trim is typically installed at the bottom edge of the siding, covering the raw edges of the bottom panels and providing a neat, finished look. This trim piece also helps to prevent moisture from entering the area between the siding and the wall. Its crucial to ensure the base trim is level and straight, using a level to check its alignment before securing it. Depending on the chosen siding system, the base trim may be attached using screws or other fasteners.
In addition to the base trim, you may also need to install other finishing trims, such as corner trims, J-channel, or window and door trims. Corner trims are used to cover the exposed edges of siding panels where they meet at corners, creating a clean and professional look. J-channel is often used around windows and doors to provide a smooth transition between the siding and other building elements. These trims not only enhance the aesthetics of the project but also serve a protective function, preventing water damage and ensuring a long-lasting installation. Remember to follow the manufacturer’s instructions for the specific installation methods and techniques for each trim type.
After all trims are installed, conduct a final inspection to ensure all panels and trims are securely fastened and aligned correctly. Take this time to address any minor imperfections or adjustments to achieve a flawless final product. This careful attention to detail will enhance the appearance and durability of your vertical metal siding.
Post-Installation Inspection and Maintenance
Following the completion of your vertical metal siding installation, a thorough inspection is crucial. Carefully examine all panels for proper alignment, ensuring there are no gaps or misaligned seams that could compromise weather resistance. Check all fasteners to confirm they are securely in place and haven’t loosened during installation. Pay close attention to corners and edges where panels meet, verifying that corner and trim pieces are properly installed and sealed to prevent water infiltration. Address any issues immediately; even minor imperfections can escalate into larger problems over time.
Regular maintenance is key to prolonging the life of your metal siding. Annually, pressure wash the siding using a mild detergent and water to remove dirt, grime, and debris. This will help to maintain the siding’s appearance and prevent the buildup of substances that could accelerate deterioration. Periodically inspect the fasteners, ensuring they remain tight. If any fasteners become loose, tighten them immediately to prevent panel movement or damage. Trim back any vegetation growing near the siding to prevent moisture accumulation and potential damage from contact.
Promptly address any signs of damage, such as dents, scratches, or rust. Minor damage can often be repaired with touch-up paint or sealant, preventing larger problems. Regular maintenance and prompt attention to any issues will ensure your vertical metal siding remains attractive and durable for many years, providing lasting protection for your building.